4. Introduction to Scripting
Learning Objectives
By the end of the session you should:
- be able to describe the typical flow of information in an interactive web application
- understand the difference between server-side and client-side scripting
- know what is meant by "controls", "events" and "event handlers"
- be familiar with the most common controls and events used in web applications
- be able to write a simple script that responds to an event
Topics
- Anatomy of an Interactive Web Application
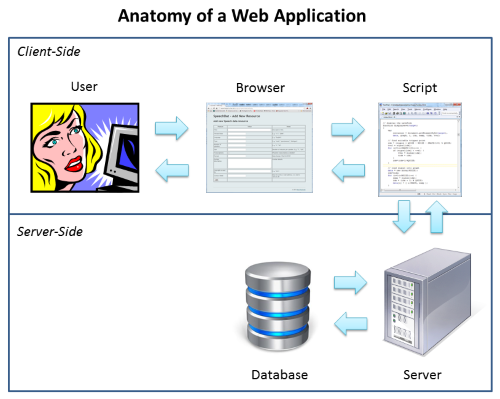
In an interactive web application, a web page displayed in a browser acts as the interface between the user and the application script. A user will typically interact with the web page by directing keystrokes and mouse clicks to elements of the page. Typically these elements will be controls such as buttons, text boxes and scroll bars, but they may also be images or regions of text. The browser then indicates to the application script that certain events have arisen on these elements, and the application script can define functions which handle these events. These handler functions perform some desired operation and then make changes to the state of the web page to show the user that their input has been processed. The script may do this by making changes to the state of the controls on the web page or to the content of the web page itself. A user interaction may simply change the internal state of the application, or it may cause the script to communicate information back to the server which might, for example, store information into a database or retrieve information from a database. Information coming back from the database via the server may end up being displayed in the web page by the script.
- Essential HTML Controls
Here are the controls that are most commonly used to create interactive web pages.
Button
A button is a labelled region which responds to mouse clicks. There are two forms of HTML markup available:
<input type="button" id="ID" value="Label" />
<button id="ID">Label</button>
Text Box
A text box is a region where the user can type a line of text.
<input type="text" id="ID" size="20" value="Example content" />
Text Area
A text area is a region where a user can type or edit multiple lines of text.
<textarea id="ID" rows="5" cols="10">
  Example content
</textarea>
Checkbox
A checkbox is a special type of button that can be in a "checked" or "unchecked" state. Clicking on the button will typically cause it to switch checked state.
<input type="checkbox" id="ID" checked /> Label text
Label text
Radio Button
A radio button is a special type of button that can be in a "checked" or "unchecked" state. Radio buttons typically come in groups, such that only one may be checked at ay one time. Clicking on a radio button will cause that button to become checked, and all other buttons in the group to become unchecked.
<input type="radio" name="group" id="ID1" checked />Option 1
<input type="radio" name="group" id="ID2" />Option 2
Option 1 Option 2
List Selection
A selection list presents a set of options to the user. The list can be displayed on one or multiple lines, and can allow single or multiple selections to be made.
<select id="ID">
<option value="1" selected>List item 1</option>
<option value="2">List item 2</option>
<option value="3">List item 3</option>
</select>
Range
The range control presents a slider which may be dragged to different positions to indicate a particular numeric value on a scale.
<input type="range" id="ID" min="0" max="10" step="1" value="3" />
Other controls
Other controls exist:
- A "progress bar" control can be used to indicate progress through a time-intensive task.
- A "file upload" control can be used to let the user select and upload a file to the server.
- A "password" control is like a text control, but the typed characters are hidden from display.
- A "date" control can be used to accept a date.
- A "colour" control can be used to accept a colour.
You can try many of these for yourself.
- Basics of Javascript Event Handlers
When a user interacts with controls on the page (by clicking on them, or typing, say) the browser raises different events. For example, when you click on a button it raises the onclick event. Our application responds to this interaction by running a Javascript function in response to the event. These functions are called event handers.
To handle events you should first indicate on each control which script function you want to use to handle each of the events you are interested in. Here we handle the onclick event using a script function button1click by adding a value to the "onclick" attribute of the button element:
<button id="button1" onclick="button1click()">Click Me!</button>
The Javascript event hander must be written inside a <script> section which is typically placed in the header of your HTML file:
...
<head>
<title>Document title</title>
<script>
...
</script>
</head>
...
The handler function in Javascript is then included in the script section, for example:
function button1click() {
   alert("Click on button received!");
}
The alert function in Javascript pops up a message to the user with the given text. Click the button below to see how this works.
In the event handler function you can access all the current contents of the web page and you can modify the content in anyway you choose. The next section explains how.
- Accessing parts of the web page through the document object model (DOM)
Within JavaScript code, the contents of the web page are made available though the document object. The document object has a number of methods that allow you to read the current state of each html element (and its contents) and to modify that state (or contents).
The document method document.getElementById() is the workhorse method since it provides access to any element in the page identified by its id attribute. Given the object returned by getElementById() you can then access any of its attributes, style properties and contents.
To access the value of a control with an ID of "ctrl", you would write:
document.getElementById("ctrl").valueTo access the HTML contents of an element with an ID of "elmt", you would write:
document.getElementById("elmt").innerHTMLTo access a style property of an element with an ID of "elmt", you would write:
document.getElementById("elmt").style.propertywhere you need to replace property with the name of a style property, see below.
In this complete example, we use a handler for a click event to set some text displayed in a <span> section of the page:
<html>
<head>
<script>
function button1click() {
   document.getElementById("reply").innerHTML =
      "<b>Hello " + document.getElementById("input").value + "!</b>";
}
</script>
</head>
<body>
  <p>Your name: <input type="text" id="input" size="20" >
  <p><button onclick="button1click()">Hello Computer</button>
  <p><span id="reply">
    Type your name and click the "Hello Computer" button.
  </span>
</body>
</html>
You can see this code working below:
Your name:
Type your name and click the "Hello Computer" button.
The line
document.getElementById("reply").innerHTML =
  "<b>Hello " + document.getElementById("input").value + "!</b>";
sets the innerHTML property of the "reply" object (actually the HTML inside a <span> tag) to the string value made up by concatenating three string values. The "+" signs in this string expression mean glue together the character strings. Note how we can put HTML element names in the strings, and these are processed by the browser just as if we had originally typed them in the body of the original document.
To change a style property of an element you can assign string values to each property in a similar manner. For example to set the color property to red you might write:
document.getElementById("elmt").style.color="red";This statement is equivalent to setting the "style" attribute directly on that element, over-ruling any style-sheet specifications.
Note that some style property names need to be modified before they can be used in JavaScript statements, this is because a hyphen "-" is not allowed as the name of a JavaScript identifier. Instead, you should remove the hyphen and change the property name to "camel case", that is capitalising the first letter of the next word. So "font-weight" becomes "fontWeight", etc:
document.getElementById("elmt").style.fontSize="14pt";Here is a complete worked example that handles the oninput event raised when a user alters the position of a range control:
<!DOCTYPE html>
<html>
<head>
 <title>Interactive CSS Property</title>
 <script>
  function range1handler()
  {
   document.getElementById("txt").style.fontSize=
      document.getElementById("rng").value+"pt";
   document.getElementById("txt").innerHTML=
      "Font size = "+document.getElementById("rng").value+"pt";
  }
 </script>
</head>
<body>
 <h1>Interactive CSS Property</h1>
 <p><input id="rng" type="range" min="1" max="72"
       value="16" oninput="range1handler()">
 <p><span id="txt">Move slider to change font-size</span></p>
</body>
</html>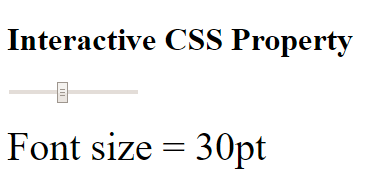
- HTML Events
The most common events are listed below.
Document events
Handlers for these events are usually assigned in the <body> element.
Event Type Description onload Document load Fires when the browser finishes loading all content within a document, including window, frames, objects and images onunload Document unload Fires when the browser removes all content from a window or frame onresize Window resize Fires when the user changes the size of the browser window Mouse events
Handlers for these events are usually assigned to controls, images, <div> or <span> elements.
Event Type Description onclick Mouse click Fires when the pointing device button is clicked over an element. A click is defined as a mousedown and mouseup over the same screen location. The sequence of these events is: mousedown mouseup click ondblclick Mouse double click Fires when the pointing device button is double clicked over an element onmousedown Mouse button down Fires when the pointing device button is pressed over an element onmouseup Mouse button up Fires when the pointing device button is released over an element onmouseover Mouse hover over Fires when the pointing device is moved onto an element onmousemove Mouse move Fires when the pointing device is moved while it is over an element onmouseout Mouse leave Fires when the pointing device is moved away from an element Keyboard
Handlers for these events are usually assigned to the <body> element.
Event Type Description onkeydown Key down Fires before keypress, when a key on the keyboard is pressed onkeypress Key pressed Fires after keydown, when a key on the keyboard is pressed onkeyup Key up Fires when a key on the keyboard is released Control state
Handlers for these events are usually assigned to controls.
Event Type Description oninput Value changed Fires when the value of a control has been modified since gaining focus onchange Value changed Fires when a control loses the input focus and its value has been modified since gaining focus There are also "touch" events which you can use to handle interactions with touch screens on smartphones and tablets.
You can find a complete list of events here.
- Some useful functions
Function name Example Description document.getElementById document.getElementById("text1") Gets object on page by its ID alert alert("Hello World!") Displays pop-up message console.log console.log("got event") Prints a message to the developer console
Resources
- Lynda video tutorials at UCL. Particularly "JavaScript Essential Training".
- Javascript for Beginners - video series from Microsoft.
- Javascript Tutorial - from W3Schools.
Exercises
- Implement demonstration demo4-1.html. Modify the code ("ex4-1.html") so that the handler function responds to the "oninput" event on textbox1 instead of requiring a button click.
- Implement demonstration demo4-2.html. Modify the code ("ex4-2.html") so that the handler function responds to the "oninput" event on range1 instead of the onchange event.
- Implement demonstration demo4-3.html. Modify the code ("ex4-3.html") so that the handler function changes the "textDecoration" property instead of the "fontFamily" property.
- Write an interactive application ("ex4-4.html") which allows you to set the "backgroundColor" property of the page from the settings of three range controls (one for each of red, green and blue). Hint: you will need to assign the colour property in the form of a string like "rgb("+red+","+green+","+blue+")".
Homework
- Watch an introductory video on JavaScript to get an idea of how JavaScript interacts with the HTML and CSS content of web pages. Both the Lynda and Microsoft tutorials are good here.
- Work through a little of a text tutorial on JavaScript, such as the W3Schools tutorial linked in the resources section.
- Build a web application which exercises all the events listed in section 3. Specify handlers for each event on the body element or on a number of HTML control elements. For each event handler, just use the console.log() function to indicate that it has been called, for example:
- Upload your homework to your exercises folder on the course web space.
function handle_onclick() {
    console.log("onclick event occurred");
}
function handle_onmouseover() {
    console.log("onmouseover event occurred");
}
...
<button onclick='handle_onclick()'
   onmouseover='handle_onmouseover()'>Click Me</button>
You can then display the console output in Chrome Developer Tools to see which events are fired as you interact with elements on the page.
Word count: . Last modified: 11:46 27-Oct-2017.